Create update package
In the ribbon under “Update” > the “Create update package” tab, assemble an update package from various components. This package allows you to update the included components on other devices as a complete package.
Note: This feature is not available on all devices, and is generally not available on older devices.
- Click the [Update] button in the ribbon, then click „Create update package“.
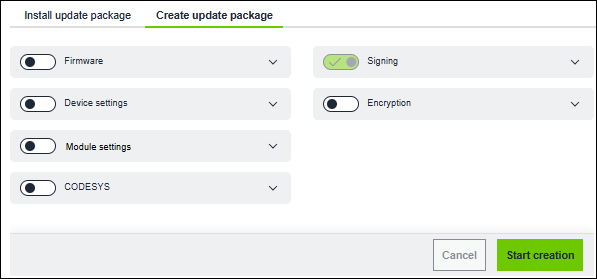
- If you select “Firmware,” it is included in the update package. You can either select a firmware file from the file system or directly from the WAGO Download Center.
- If the selected firmware does not match the currently configured device, you will receive a notification and can select a different file (depending on the target device for the update).
- In the WAGO Download Center, the currently configured firmware version is always selected first.
- If you select “Device settings,” the device settings will be included in the update package. You can exclude certain features by checking the box next to them in the selection field.
- If you are using a device with I/O modules, “Module settings” will appear. Select this option to include I/O module data in the update package.
- If you select CODESYS, you can include the CODESYS application in *.atpkg format in your update package. Alternatively, you can choose whether the existing CODESYS application should be deleted.
*.atpkg files can be created in CODESYS using the WAGO Solution Builder add-on. Download the add-on from the WAGO Download Center and install it in CODESYS (Tools > CODESYS Installer > Install files). Create an “Application Template Manager.” To do so, click “Application” > “Add Object” > “WAGO Application Template Manager” within the project tree. Assign the object a title. Download the *.atpkg file via the “WAGO” tab > “WAGO Solution Builder” > “Export Application Template.”- The “Signing” option cannot be disabled because update packages must always be signed. If a private key has already been selected, it is shown here with a green check mark. If no private key for signing has yet been selected, do this in the general settings:
Click [Set private key] to go directly to the general settings, or click the gear icon in the top bar. - In the “Update Packages” tab, select the private key (PKCS#8-encoded) using the file selection option.
- The file is verified against the valid key.
- Close the general settings.
- The key is applied and the update package is signed with the key.
- Select “Encryption” if you want to encrypt the update package with a password. Enter a password and repeat the entry.
- To create the update file, click [Start creation].