Modbus – First Steps
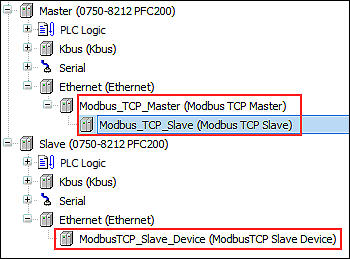
For the “Modbus” fieldbus, note that for the Modbus master and slave device, an “Ethernet” element has to be created first. The Modbus master and slave are inserted under it. A representative of the slave is inserted under the Modbus master and establishes a connection between the master and slave via the slave IP address.
- You need to have inserted two devices in your project. One of the devices will play the role of the Modbus master and the other that of the Modbus slave.
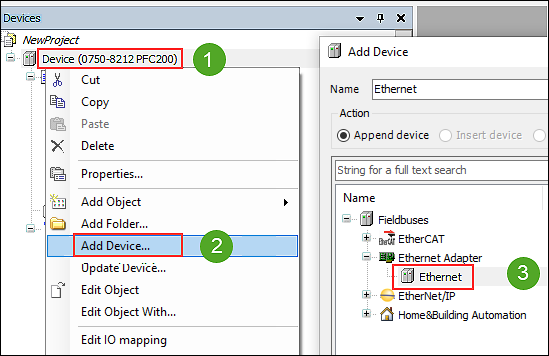
- First create an “Ethernet” fieldbus element for both devices in the device tree. To do so, right-click on the respective device and select Insert Device ....
- Select the “Ethernet” fieldbus under “Ethernet Adapter.”

- Click [Insert Device] and leave the dialog open.
- A new “Ethernet (Ethernet)” element is created in the device tree.
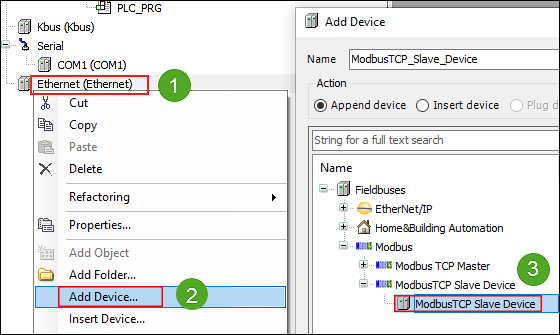
- Click on the new “Ethernet (Ethernet)” element.
- Under “Modbus,” select the “Modbus TCP Slave” for the slave device in the dialog that is still open, confirm with [Insert Device] and leave the dialog open.
- Under “Modbus,” select the “Modbus TCP master” for the master device in the dialog that is still open, confirm with [Insert Device] and leave the dialog open.

- Click the “Modbus_TCP_Master (Modbus TCP Master)” element in the device tree and insert the “Modbus TCP Slave Device” element from the dialog that is still open.
- You have now inserted a slave element under the master in the device tree, through which the connection between the master and the physical slave is established.

- To link the master and slave, now enter the IP address of the slave device for the “Modbus_TCP_Slave (Modbus TCP Slave)” slave element below the master. To do so, double-click “Modbus_TCP_Slave (Modbus TCP Slave)” to open the configuration and enter the IP address of the slave device on the “General” tab.
You can find a complete example project in 8 Example Project: Creating a New Modbus Project in CODESYS.