Perform Update
Update devices in the ribbon under “Updates.” You have three options:
- Load firmware updates as an update package directly from the WAGO Download Center onto the device.
- Load firmware updates as an update package from the file system onto the device.
- Load a previously created update package consisting of multiple components (see Create update package) onto the device.
Changing the firmware version is not only useful for a regular update; older firmware versions can also be used, for example, to readjust older configurations (compatibility required).
 NOTICE
Follow instructions to avoid damage to equipment
Interrupting the update/downgrade process may damage the device. For this reason, observe the following information.
Hardware Notes
- Do not switch devices off.
- Do not interrupt the power supply of the device.
- Do not remove devices from the node group.
- Ensure that communication with the device is not interrupted during the update.
- For updates via the service interface, disconnect the fieldbus cable from the device beforehand.
- Do not exit the software during the operation.
Software Notes
- Stop application on device before performing the update.
- Programs and data on the device can be lost during the update. Make sure you have a recent backup of the data.
- The application and other files in the memory or file system must be transferred to the new controller after updating.
- After replacing the firmware, note the new firmware version (xx) in the box provided on the controller.
 Note
Note
Disclaimer for Updates!
Liability claims against WAGO GmbH & Co. KG relating to material or immaterial damage caused by updates (e.g., firmware changes) are excluded. Use is at the risk of the user exclusively.
Note
Additional information from WAGO Support!
Please contact WAGO GmbH & Co. KG Support for more information on updates/firmware changes.
Note
Updates can take a few minutes!
Note that updates, e.g. replacing the firmware, may take several minutes depending on the hardware configuration of the device.
Depending on the firmware your device is using, the appearance and content of the “Update” tab may vary.
The operation of the two possible variants is explained below:
Version 1
- You have added a device to your project (see Add Devices in the Project).
- The device is connected online (see Connect Devices).
- You have downloaded a new update package for your device via WAGO Navigator or from the WAGO Download Center (alternatively, select the WAGO Download Center directly as the update source below).
Or: You have created an update package consisting of various components (see Create update package). -
Both the update packages themselves and the firmware they contain must be signed. These signatures cannot be disabled when an update package is being created, and the device verifies them when the update package is installed.
For update packages provided by WAGO (e.g., update packages with WAGO firmware that you download in WAGO Navigator/WAGO Download Center), the necessary certificates for verifying the signatures are already known to the device. If you install an update package you created yourself, you must make the certificates for signature verification known to the device as follows:
Click “Update Signatures” and, on the page, add the corresponding certificates used to verify the signatures. Depending on the contents of the update package, a certificate may be required and need to be specified either only for the update package, or also for firmware included in the update package. You can store your own certificates in the settings under “Certificates” > “TrustStore” > “CACertificate” and transfer them to the device.
To make it possible to install WAGO update packages again at a later time, remove the corresponding entries from the “Update Signatures” page. As long as your own certificates are configured there, the device accepts only update packages with the matching signature.
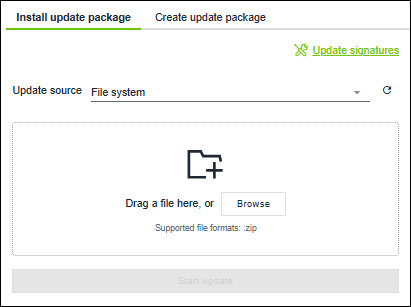
- In the ribbon, click [Update] and “Install update package.”
- Select the “Update Source” for the update package in the selection field:
- Load update package via “File System”:
Drag the update package to the drop area.
Alternatively, click [Browse] and select the update package. - The file name of the selected update package is displayed. Use [Choose another file] to change the update package as needed.
- Load update package directly from “WAGO Download Center”:
Select one of the firmware versions displayed under “WAGO Download Center” as the update source. - A dialog prompts you to log in with your WAGO Premium account, if you have not already done so. This is required to download update packages (see WAGO Download Center Log In).
- Click [Start update].
If you selected an update package that was encrypted during creation, please enter the password first. - The update package is first loaded onto the device. The connection between the device and the engineering PC is terminated. The update process then starts on the device. The update may take approximately 20 minutes. During this process, the WAGO Device Manager is only available in offline mode.
- The device restarts after the update.
- After the update, reconnect to the device.
- If errors occured, they are displayed in the message window and in the “Update” tab.
- The device uses the new firmware and – if additional components were updated via an update package – the changed or additional settings.
Version 2
Note
Note on device- and firmware-dependent specifics
Note that certain devices (as shown in the following view) do not support the creation and installation of custom update packages due to firmware and/or device-specific limitations.
- You have added a device to your project (see Add Devices in the Project).
- The device is connected online (see Connect Devices).
- You have downloaded a new update file for your device in the WAGO Download Center or you will download it directly via the WAGO Download Center below.
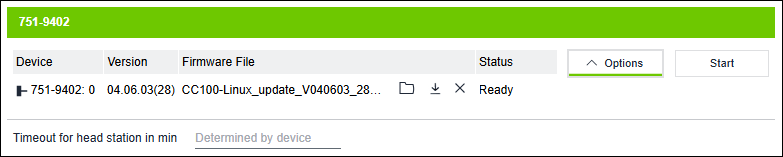
- In the WAGO Device Manager, select the device for which you want to change the firmware.
- Click the [Update] button in the ribbon.
- The “Update” view opens and shows the device and the firmware version currently in use.
- Click on the folder icon
 and select the downloaded update file from your file system.
Alternatively, click the download icon to select the update file directly from the WAGO Download Center.
 - Optional: Click [Options] and enter a timeout for the head station.
- Click [Start].
- The steps that are carried out during the replacement process are displayed under “Status.”
- If you want to cancel the running replacement operation prematurely, click on the Cancel icon
 in front of the respective progress bar. In such case, the previous firmware is restored.
- After the firmware has been successfully replaced, the new firmware version is displayed next to the device name.