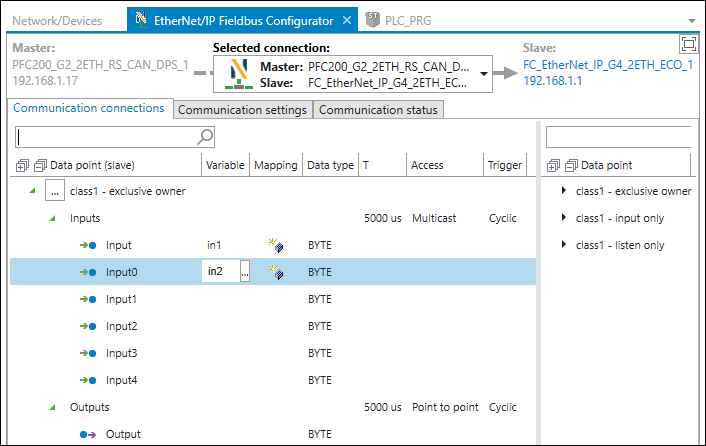
“Communication Connections” Tab
The “Communication Connections” tab primarily provides the slave connections for the master, which can then be further edited.

Right side of the tab:
The connections that the slave provides appear on the right side of the tab. The connections appear with their data points grouped by inputs/outputs.
Note: If this area is empty, you must first create the connections with their data points in the data point configurator (see Adding and Editing a Connection).
If the data points already created in the data point configurator are incomplete here, check the input and output size of the connection.
A search field is available to filter the connections provided.
Parameter | Description |
|---|---|
Data Point | Name of the available slave connections and the corresponding data points |
Left side of the tab:
The connections that the master actually uses appear with their data points on the left side of the tab; see Providing the Slave Connection for the Master.
The table provides an overview and serves to map the data points to variables. The [...] button to the left of the respective connection name allows you to modify the displayed connection settings; see Editing a Connection.
Parameter | Description | |
|---|---|---|
[...] Data Point (Slave) | Name of the slave connection used by the master The data points appear under the respective connection names organized hierarchically by “Inputs”/ “Outputs.” The [...] button opens the Editing a Connection dialog to adjust the connection settings. | |
Variable [...] | Name of the variable that is mapped to the slave data point The name can be entered/modified by double-clicking on the respective field in the “Variable” column. Assigning the name performs a mapping: The defined name of the data point is created globally as a variable and can be used in the program. The [...] button to the right of the variable opens the input assistant, which can be used for mapping to variables that already exist. | |
Mapping | Indicates which variable is new and which variable already exists: | |
| The variable is not yet available, will be newly created and can then be used throughout the entire project. | |
| A variable that already exists is used for the mapping. | |
Data Type | Data type of the slave data point | |
T | Transmission interval for data packets in ms or µs (corresponds to the RPI – “Request Packet Interval” – according to the EtherNet/IP standard) | |
Access | Type of access to the connection (corresponds to the “Connection Type” according to the EtherNet/IP standard): | |
Multicast | For data points under “Inputs” (T → O): | |
Point-to-Point | The slave sends data to exactly one master (T → O) or receives data from exactly one master (O → T). | |
Trigger | Specifies how the data exchange is triggered (corresponds to the “Production trigger” according to the EtherNet/IP standard): | |
Cyclic | Message transfer is triggered periodically at a specific recurrence interval (packet rate). | |
Change of State | Message transfer is triggered by the change of a specific state. | |
Application Object Triggered | Message transfer is triggered by the application | |

