Activating Runtime Licenses
Some devices provide the option to use additional functions that have not been provided with a license from the factory. If you use such functions, e!COCKPIT prompts you at different places regarding the license requirement and asked you to enter a corresponding license key.
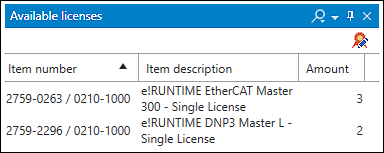
Licenses that you have also purchased and entered are displayed in the “Available Licenses” control panel.
Displaying Available Licenses
- Open the “Available Licenses” control panel from the ribbon, “VIEW” tab, [Available Licenses] button.
- The control panel displays all available runtime licenses for which you have already entered a license key and that can be linked to a device (License status: “Available”). Licenses with the same item number are combined in one line.

Manually Assign Licenses to a Device
- Open the “Project Licensing” control panel from the ribbon, “VIEW” tab, [Project Licensing] button.
- You see a list of all devices in your project with the respective license requirement.
- If you are looking for a specific device in the list and the list is very long, it may be helpful to select the device (e.g., from the tile) in the “Network/Devices” view. The respective device is then selected analogously in the list of the “Project Licensing” control panel.
- You can also filter the list of devices by selecting only devices with a license requirement (yellow warning triangle). Activate the [Not Licensed] button (blue background when activated) and deactivate the [Licensed] button. The results list is limited.
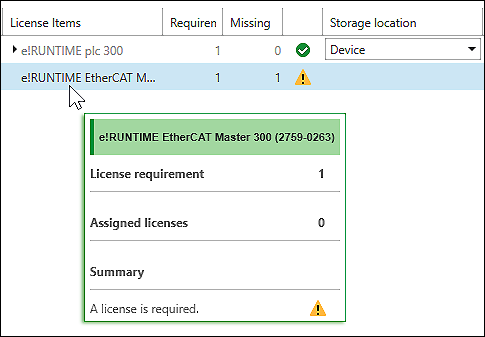
- A yellow warning triangle identifies devices that have a license requirement. Move the mouse over such a device to obtain more information.
- The tooltip displays what licenses are missing to use the licensed device function or library.

- Drag the respective license row, which may contain multiple licenses, from the “Available Licenses” panel to the device in the “Project Licensing” panel. You can also drag the license directly onto the required device in the “Network/Devices” view.
- Only the number of licenses required to cover the license requirement is used.
- The license status changes to “assigned”. Device and license are linked to each other. A green checkmark indicates that the license requirement is covered.
Auto-assign Licenses
The “Auto-assign all” function is recommended if, for example, you have a large number of devices with license requirements or you are uncertain when assigning licenses. In such case, e!COCKPIT checks what license is used for which device or what license requirement is used and makes the assignment automatically.
Tip: To get an overview of which function is assigned with which license, e.g., you can use the product documentation (Backstage view > “Print” page > “Document project”).
- To automatically assign available licenses to devices, either click the [Auto-assign all] button in the “Project Licensing” control panel or in the “DEVICE” tab in the ribbon.
Load license(s) on the device
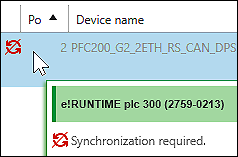
Changes, such as assigning licenses, are initially made offline in the software itself and require synchronization with the device. This is indicated by an icon before the device and in the tooltip of the device.

- Click the [Synchronize] button.
- A connection is made to the device and the system checks if there is already a license in the device. If a license is assigned offline, it is transferred to the device.
- The status of the license changes to “linked”.
- If the information on license use has already been transferred to WAGO GmbH & Co. KG, the license is activated. Device functions and libraries can be used.
Purchase Licenses Later
If you use a function that requires a license that is not included in the scope of delivery of the device, the license requirement is displayed in the “Project Licensing” control panel. You also have the option of generating an order list with the required licenses in the control panel.
- Open the “Project Licensing” control panel.
- Click [Create order list].
- An Excel file is created that contains a list of all license articles required to execute the project.
- Adjust the list based on your license needs and place an order to mailto: orderservice.de@wago.com by e-mail.
- After purchasing and receiving the license, click the [Enter licenses] button and enter the license key(s) obtained from WAGO (see Activating the License).
- Click [Add licenses] to add the license to the “Available Licenses” control panel.
- Continue assigning the license and synchronizing as previously described.
Delete License Link
- In the “Product Licensing” panel, select the link to the license to be delete.
Tip: When you click a device, all licenses on the device are unlinked. However, you can also select a single license or multiple licenses (by holding down the Ctrl/Shift key) to unlink. - Click [Unbind].
- If the license had not yet been loaded on the device, the license is deleted from the list and displayed in the “Available Licenses” control panel. You can use the license again.
If the license has already been loaded on the device via synchronization, the license is earmarked to be unlinked (status: “Unbind”).
This is indicated by the “Synchronization required” icon before the respective lines. The license is deleted from the “Project Licensing” control panel after synchronization and displayed again in the “Available Licenses” control panel.
 Note
Note
In case of an error message, restart the device in “STOP” mode!
If there is an error message when deleting the license, proceed as follows:
- Move the controllers mode selector switch to “STOP”.
- Restart the controller.
- Synchronize the license again.
For additional information see:
- Requirements > Licenses
- Starting > Purchasing a License
- Starting > Activating the License
- Backstage View > “Licensing” Page
- Panels > Available Licenses
- Panels > Project Licensing