“PROGRAM” Tab
The “PROGRAM” tab contains functions for programming and loading the application onto a device. Actions of this tab always refer to active applications, i.e., applications that are connected or simulated online.

The “PROGRAM” tab contains the following operating elements:
Button | Description | |
|---|---|---|
“Connection” Group | ||
| Connect | Opens an online connection to one or several selected devices. The CODESYS application is connected with the target system. An ongoing online simulation is closed. The status of the button depends on the devices selected: “Connect” if no device is connected, “Disconnect” if all selected devices are connected. If the selected devices have different connection states, all devices are disconnected on the first click and connected with a second click. Connection requirements: - program compiled error-free Connection to the selected device (login) is performed for all applications. A download is executed, if necessary. |
| Disconnect | Disconnects the development and target systems (controller or simulated device) and returns to offline mode |
“Online” Group | ||
| Simulate application | Can be selected if there is no online connection Starts Simulation mode The mode starts and debugs an application on a simulated target device in order to test the online behavior of an application in advance without requiring the actual device. No communication settings are required for the simulated device. When a function is called for the first time, a prompt asks whether the application is to be created or loaded. An active simulation mode is displayed in the message bar and in the “Messages” panel. |
| Close simulation | Closes the simulation mode; the simulation is also closed if the [Connect] button is clicked. |
| Start | Starts the application on the controller or in the simulation |
| Stop | Stops the application on the controller or in the simulation |
| Reset | All Reset commands cause a restart in online mode. The set breakpoints in the project are deactivated. Reset (warm): Resets all variables of the active program to their initial and default values apart from the retentive variables (Retain, Persistent). Behavior is the same as switching the controller off and on while the program is running (e.g., in the event of a power failure). Reset (cold): The same as the “Reset warm” command, but also resets the retentive variables of the active application to their initialization values and default values (behavior is same as the start of the program currently loaded onto the controller). Reset (original): Resets the values of all variables of the active application to their initialization values and deletes the program on the controller. |
“Functions” Group | ||
| Program download | Builds and compiles the active application in online mode, i.e., a syntax check is executed, application code is generated and then downloaded to the controller The compilation log is created in the project directory. All variables are reinitialized apart from the persistent variables. |
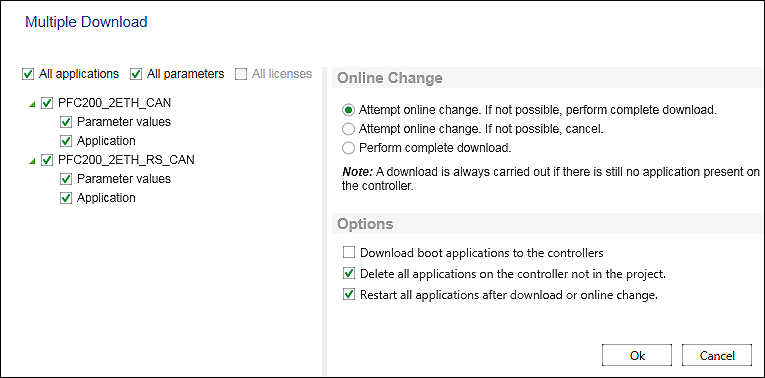
| Multiple download | Opens a dialog with a list of all project applications and parameters These can be selected and the selected device(s) can be loaded.
Project devices, applications and parameters that can be selected via checkboxes are displayed in the left-hand area. “All applications” selects all applications of the project. “All parameters” selects all of the project parameters. “All licenses” selects all licenses of the project. In the right-hand area, the standard CODESYS options are listed that refer to the changes, online change and (renewed) download of the application (see CODESYS Online Help, “Multiple Download”). Changes to these CODESYS options are saved user specific and preselected when there is a multiple download again. [OK] loads the selected applications and parameters to the selected devices. [Cancel] closes the dialog. |
| Boot application download | Saves the boot application under the name <Application_name>.app on the target device. This automatically begins when the controller is started. If the controller is in offline mode, the current application is first stored as a boot application in the project directory in order to download it later to a target system. |
| Edit offline | Enables the editing of a currently connected application The changes can be downloaded later to the controller via “Download Changes.” |
| Changes download | Compiles changes to the active application carried out offline and downloads them to the controller |
| Compare Applications | Opens a dialog and compares the selected application in e!COCKPIT and the application on the device:
The results of the comparison are displayed:
Status messages::
[OK] closes the dialog. |
“Source code” Group | ||
| Compile | Checks the source code of the active application for errors |
| Rebuild | Checks the source code again |
| Generate Code | Compiles the source code of the active application. The code is not loaded onto the PLC. |
| Clean | This cleans the compiler information for the currently active application on the development system. The compiler information was created the last time the application was downloaded to the target system and saved in a “*.compileinfo” file on the development system. Note: Reload the program to the controller after cleaning if you wish to use Online Change, otherwise it is not possible to execute Online Change. |
| Clean All | Deletes the compilation information for all applications. |
| Syntax check Project Library | Checks the syntax of the created library The button is visible if a library template was selected in the Start or Backstage view. |
“IEC library” Group | ||
The “IEC Library” tab group is visible if a library template has been selected in the Start or Backstage view. | ||
| Compile and save | Compiles and saves the library with the file suffix “compiled-library” |
| Save in library repository | Saves the library to the system repository |
“Search” Group | ||
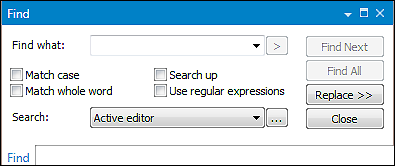
| Search | Opens the “Search” dialog.
|
Find what: | Searches for the expression entered or selected from the drop-down list | |
Match case | Distinguishes between upper/lower case | |
Search up | When selected, searches for previous occurrences of the expression | |
Match whole word | When selected, searches for an exact term without additional characters | |
Use regular expressions | When selected, allows the use of syntax rules for evaluating the expression, e.g., characters “*,” “+” or “?” | |
[Find Next] | Searches for the next expression | |
[Find All] | Displays all hits of the search expression in the “Messages” panel Double-clicking on this entry enables you to move in the editor to the appropriate position. To minimize the load time, up to 1000 hits are displayed in the list. The next 1000 hits are loaded by clicking the [...] button at the end of the list. | |
[Replace >>] | Opens a “Replace” dialog This dialog contains the following additional options:
| |
Search: | Selects the location to be searched:
[…] opens a dialog with the additional option to search in objects and store this search as a search scheme. | |
[Close] | Closes the “Search” dialog. | |
| Opens the quick access list for the search. | |
Search | Opens the “Search” dialog (Ctrl + F) | |
Replace | Opens the “Replace” dialog (Ctrl + H) | |
Next | Shows the next occurrence of the search expression (F3) | |
Next (selection) | Displays the next occurrence of the search expression (Ctrl + F3) selected in the editor | |
Search previous | Displays the previous occurrence of the search expression (Shift + F3) | |
Search previous (selection) | Displays the previous occurrence of the search expression (Ctrl + Shift + F3) selected in the editor | |
| Show cross references | Opens the cross reference list with the references of a variable in the project (see Cross Reference List) |
| Mark declaration | “Source text navigation”; jumps to the relevant definition/declaration of the identifier that the cursor is positioned on. |
“Import/Export” Group | ||
CODESYS V3 | ||
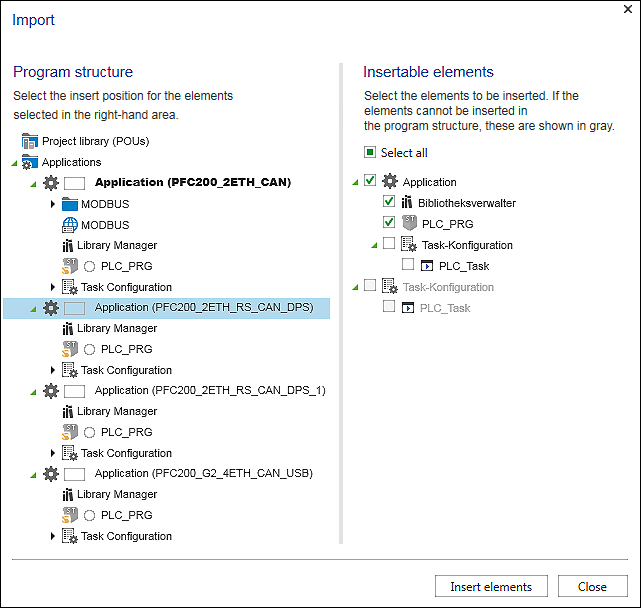
| Import | Opens a browser window to select the CODESYS V3 program elements to be imported After selecting the required *.export file, a dialog appears where you select the insert position in the program structure and the elements to be inserted.
[Insert Elements] imports program elements from an export file *.export. [Close] closes the dialog. No file is imported. |
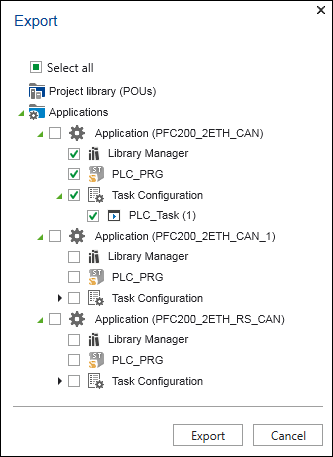
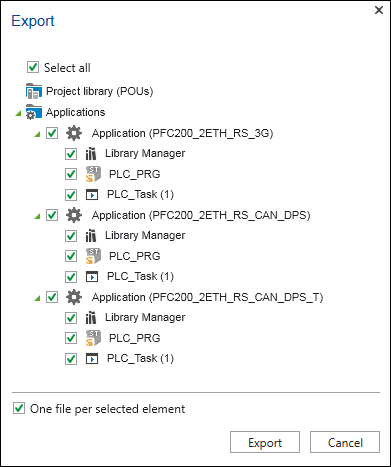
| Export | Opens a dialog window for exporting CODESYS V3 program elements to an export file
[Export] exports selected CODESYS V3 program elements to an *.export file. [Cancel] closes the dialog. An export file is not created. |
PLCopen-XML | ||
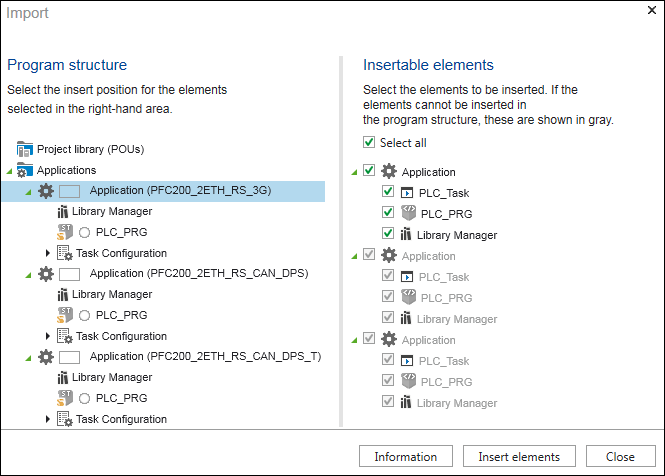
| Import | Opens a browser window to select one or more XML files in PLCopen notation that can contain project components or entire projects The standard format “PLCopen XML” is specifically used for exchanging project data between different development systems based on IEC 61131-3. After selecting the required file(s), the “Import” dialog opens where you select the insert position in the program structure and the elements to be inserted.
[Information] displays information on the import file. [Insert elements] imports the selected elements from the file or selected files. The file elements are inserted at the insert position on the left side of the dialog in the program structure. [Close] closes the dialog. No file is imported. |
| Export | Opens a dialog window for exporting project sections or entire projects
[Export] exports selected objects of the program structure in an XML file according to the PLCopen standard. [Cancel] closes the dialog. An export file is not created. “One file per selected element” exports the elements selected in several PLCopen-XML files, if activated. One directory is created per application or controller. The directory name corresponds to the application name. The names of the exported files correspond to the name of the elements in e!COCKPIT. |
“Edit” Group | ||
| Input Assistant… | Shows the input assistant for browsing variables, calls, operators and keywords |
| Auto Declare… | Opens a dialog to declare a variable interactively |
| Go To Source Position | Select the source position which corresponds to the selected message |
| Refactoring | Opens a context menu to rename/change variables: “Rename” renames all occurrences of the selected variable in the project. “Add Variable” adds a new variable to a POU. “Remove” deletes all occurrences of the variable in the project. “Reorder Variables” reorders the IN, OUT and INOUT variables of a callable POU. “Update Referenced Pins” executes a global pin update action. |
| Advanced | Opens a context menu with further help: “Overwrite Mode” switches between input mode (IM) and overwrite mode (OM). “View Whitespace” displays empty spaces (spacebar, tabulator, new lines). “View Indentation Guides” “Go To Line…” moves the insertion point to the specified line. “Make Uppercase” changes the selected text to uppercase. “Make Lowercase” changes the selected text to lowercase. “Go To Matching Bracket” moves the insertion point to the position that matches the current brackets. “Select To Matching Bracket” selects the area between the current position and the position of the associated brackets. “Expand All Folds” expands all sections in the current text. “Collapse All Folds” collapses all sections in the current text. “Update frame parameters in [...]” opens a dialog to customize visualization references. Customization can be required after interface changes in visualizations. The dialog lists all affected visualization to reassign the parameter transfers to the changed interface (see also CODESYS online help, index “Frame” > “Update parameters, visualization”). |
For additional information see:
- Workspace > General Status Display for Connections
- Operating > Connecting and Disconnecting Devices
- Operating > Downloading Applications to the Device
- Operating > Starting Application
- Operating > Importing/Exporting Program Elements
- Operating > Creating Libraries
- Operating > Compiling and Validating an Application
- Operating > Using Key Combinations (Shortcuts)




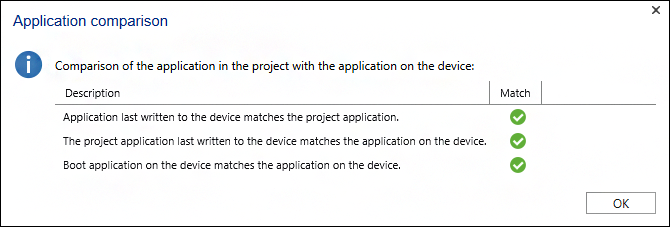
 Applications match.
  Applications do not match.
  The device is not accessible or the applications cannot be compared (e.g., if no application has been downloaded).


